Note: The Shrine of Palmir Plateau is not recommended as mobs are usually too powerful for Rank 3 players unless they have a high-level pet.
A Good Team[]
1 Tank: Takes damage for party by using aggro abilities. Knight are the best option, but Champions and sometimes Soldiers may play the role. The tank should be of a higher level than the rest of the party.
1 Battle Kahuna/Druid: The main reason for having these jobs in the party is because of their buffs. Rock Energy substantially lowers the damage taken, so if a disaster occurs, then it can help. Other than that, they can provide their attacks and healing. They are also prized for their Crowd Control skills, Druids more so. A well played Druid/Battle Kahuna can decrease the number of monsters the tank is forced to deal with, lowering the amout of damage they take therefore making the healer's job easier.
Healers: In most cases, 2 healers work well as there is twice as much MP used for healing. Some parties who plan to kill a Boss may decide to use 3 healers as a precaution. At lower and even higher lvls, Priests make a good addition to any party because of their MP regen skills, however if need and/or choose to have a second healer then Bishop is the way to go. Bishops generally by default have a large mana pool and high M.Atk. With most mobs having low mdef, bishops hit hard. Also they have many stuns, debuffs, DOTs and AOEs that help with mob control.
1 or 2 Pet Classes: These jobs are meant to enhance the ability of pets. Pets can contribute to damage output, so they are important. Also, they are competent Damage Dealers. At this rank Pet classes generally do not have the skills unlocked that make them powerfull, auras for Battle Summoners, and Boosts for Soul Breeders. The exception is Evoker as they do rather good damage even without end game skills.
1 Assassin: Built based on Strength, they can inflict enough damage to take aggro off the tank. Built based on Vitality, they can make adept tanks. However, their main role in a DP is to be a Damage Dealer. With high movement speed and the skill, Cloak of Shadow, Assassins are sought after to lead parties. They can easily outrun mobs and lose aggro once they are at the destination by hiding.
1 Chaos Magician/Warlock: Although difficult to find these members, they are a valuable asset to the party. These are great Damage Dealers, and their buffs and debuffs can greatly help any situation.
Any more room in the party should be taken up by one Puller (Archer or Shadow Hunter),Damage Dealers and players with ranged pets such as a Red Pixie or a Harpy.
Generally a good, well balanced party consists of a Tank, a Healer, a Druid/Battle Huna, a Chaos Magician/Warlock, and 4 Damage Dealers. These may consist of any of the Warrior/Hunter classes, additional Healer/Dark Magican classes, and Pet classes as needed. Feel free to Swap out classes freely though, it is better to have a full party than to wait for 20 Minutes looking for a Kahuna class to fill that last slot. It's often best to look for a tank and the three mage classes first, as it is generally far easier to fill a Damage Dealer or Pet class slot than a Healer or Mage class.
Breakdown[]
Level 50 - 55: At this level, Oforia should not be a challenge, assuming that the Tank is decent and that there are two healers. Grinding in Abhuva's room is not a bad idea either, but Abhuva may prove to be more than a challenge to players at this level.
From level 50 onwards, you should start to look for DPs at Lost Mines.
Level 52 - 56: The Controller 1 room (with Evil Scale Horror) is a good place.
Level 55 - 59: The Controller 2 room (with Burzom) is a good place.
Level 58 - 62: The Controller 3 room (with Cryptic Autopsy) is a good place.
Level 61 - 65: The Controller 4 room (with Carnival Venom) is a good place.
Level 66 - 70: The Main Dungeon Boss Room (with Taranida) is a good place. Note that no action should be made against Taranida as she can easily wipe out your party.
From level 70 onwards, you should start to look for DPs at Crystal Valley.
Level 70 - 75 The Controller 2 room (with Crystal Grinder) is a good place.
Level 72 - 78 The side room of the Controller 2 room is a good place.
Level 76 - 80 The Controller 3 room (with Draco) or the side room of Crustalino are good places.
Level 79 - 80 The Controller 4 room (with Alien Brain) or the side room of Draco are good places.
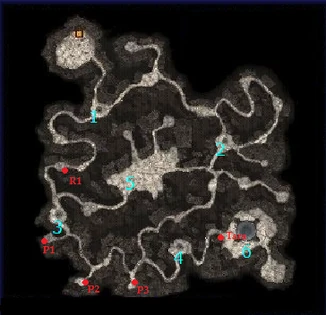
Dungeon Localizations and Rooms[]
From lvl 50 to 70, you will no longer have Dungeon parties in Relic of Arid Moonlight, but in Lost Mines.
There are several rooms you could Dungeon party in, but your Dungeon party lvl must neither be too high or too low for the room, otherway the amount of gained Experience will not be efficient.
The Fast rooms (Red letters on the map) according to the Dungeon Party lvl settle as following:
From lvl 50 to 55, the well balanced place to have a Dungeon party is in R1 where monsters are lvl 54 to 57.
From lvl 53 to 59, the well balanced place to have a Dungeon party is in P1 where monsters are lvl 58 to 63. P1 is referred to by many in-game as DE1, or Dead End 1
From lvl 55 to 60, the well balanced place to have a Dungeon party is in P2 where monsters are lvl 60 to 65. This is DE2.
From lvl 57 to 65, the well balanced place to have a Dungeon party is in P3 (DE3) where monsters are lvl 63 to 68.
From lvl 60 to 70, the well balanced place to have a Dungeon party is in Tara corridor where monsters are minimum lvl 65.
Those rooms are named Fast rooms because the mobs that are within have a fast respawn rate.
It is adviced to always focus on killing a monster with a Red name, in order to keep the dungeon party safe.
It is still possible to have a Dungeon party in a Boss room (Blue numbers on the map):
Controller 1 - Boss 1: Evil Scale Horror lvl 55**; the monsters in the room are lvl 50 to 55.
Controller 2 - Boss 2: Burzom lvl 60**; the monsters in the room are lvl 57 to 61.
Controller 3 - Boss 3: Cryptic Autopsy lvl 61**; the monsters in the room are lvl 56 to 61.
Controller 4 - Boss 4: Carnival Venom lvl 69**; the monsters in the room are lvl 65 to 70.
There are two special Boss rooms where having a dungeon party is harder than in the Controller rooms:
Dungeon Boss 1: Primal Scream lvl 60??; monsters in the room are lvl 58 to 63.
Dungeon Boss 2: Taranida lvl 70??; monsters in the room are lvl 65 to 70.
The difficulty in those two rooms is their size: they are bigger than the normal rooms, and the amount of monsters is higher too. Having a Dungeon party there may end up to death because of the numerous linked monsters. It's not advised to DP in those rooms unless there are enough players who know their class well or, as a last resort, have high lvl pets.
One thing to be aware of is High Level Pet parties, or HLP parties, which are more common in R3 dungeons as of late. These have become very common since the introduction of the Witch quest line, since many characters with high-level main characters rush through a new character for the reward of an Empty Rare pet card. (One thing to note, many people will often begin the Witch quest at level 70 and completely skip Dp'ing in Crystal Valley, as if you successfully complete the quest line you will go straight from level 70 to 88 and begin Dp'ing in Shrine of Palmir Plateau).
A HLP party often involves several pets level 95 or higher, and dungeon stragegies vary significantly due to the increased damage output that these pets offer. These parties often have anywhere from 5-8 mobs pooling around the DP at a time, so crowd control is unnecessary. Controlling your level of Aggro or Threat and allowing the pets to handle the roles of DD and Tank is a must. This means not using any skills that generate threat, since most pets hold a small amount of threat because of their damage output. Using a skill that multiplies your own threat, like Shield Smash or Life Leech, would prove fatal since many of the pooled mobs never get agro lock until the party is trying to kill them. Many times, the pets do not need to be healed and a Cleric will not generally be necessary except for buffing and emergency situations. Often a high-level Blue Pixie or a Kahuna can provide the healing needs of the party. Other buffing classes, like DM or Huna, can help damage output and kill speed immensely but are also not required.
Useful Information[]
Eliminate supportive mobs first, then aggro-sensitive, then regular.
Target mobs from 2 levels below to 5 levels above; killing should be fast and efficient.
Always use Luna Chips; be fair to all party members.
Always keep an eye on your healer(s)- it's very easy for them to get aggro due to the high threat modifier on all healing spells. If you see their hp going down, use a HP scroll on them and disable (stun, sleep, blind, seal, petrify) the mob, chip and attack it. Use a hp grocery on yourself to provide a heal-over-time (so the healer doesn't get more aggro from healing you).
Watch the tanks' mp- when it gets very low use a mp scroll on them, as they use skills to maintain threat and reduce damage.
Feel free to use crowd-control skills if the tank has lots of mobs on him, for example- nightmare, dark water seal, sonic cross, blinding dust, sleeping dust, windy shackle, etc. This reduces the damage the tank is taking which reduces the amount of healing the priest/bishop has to do- this allows them to deal more damage to increase kill speed. Be aware that the mob may come for you when the skill wears off if the tank hasn't grabbed aggro, so be ready to use hp recovery items to keep yourself alive.